Spelt Sourdough Bread Recipe
In my previous post, I wrote some basic facts about sourdough bread, its advantages in comparison to “normal” bread and why many people who would normally have to avoid bread in their diets, can eat sourdough bread without any problem.
Now I will write a pretty intuitive recipe for making spelt sourdough bread at home. If you already did some research on sourdough online, you must have noticed that there are almost no approximate “recipes” and that quantities of all ingredients are usually precisely measured.
The lazy baker’s take on sourdough
With this simple spelt sourdough bread recipe, even the “lazy bakers” can do it!
The whole procedure of making sourdough bread sometimes reminds me of laboratory practice protocols. Those detailed descriptions can indeed be useful if you want to understand the whole process more deeply.
But, since the internet is already full of such recipes, I will now present a lazy baker’s way to make spelt sourdough bread without measuring anything – for all those people who can never follow a recipe and like to do everything by feeling (don’t worry, that includes me too).
I am sure that our ancestors didn’t have kitchen scales or thermometers, or awareness of the definition of the word autolyse, and they could still make good sourdough bread.
A good starter is the key
There is one thing that is crucial for good sourdough bread, and that is a good starter. There is no shortcut or alternative solution; without a proper starter, it just won’t be the same thing. That is why you need some patience at the very beginning of the process. Once the starter has developed, you can have it forever.
What is a sourdough starter anyway?
A sourdough starter is a fermented mixture of flour and water. It is full of microorganisms (wild yeasts and bacteria that naturally live/exist on the grains or in the air) that are useful for us: they feed on the sugars from the grains, and some of the important products of that feeding process are lactic acid and carbon dioxide.
That is why a freshly fermented starter smells sour and has lots of bubbles in it, and an older starter smells like yeast and alcohol (further fermentation leads to the occurrence of alcohol, and yeasts naturally reproduce more and more). Both of these starters are good for sourdough making, but their texture must be very bubbly, light and airy.
If there are not many bubbles in a starter, it means that it had not fermented enough and hence the bread will turn out very heavy.
How to make a spelt sourdough starter
This is how you can make a good spelt (or any) sourdough starter:
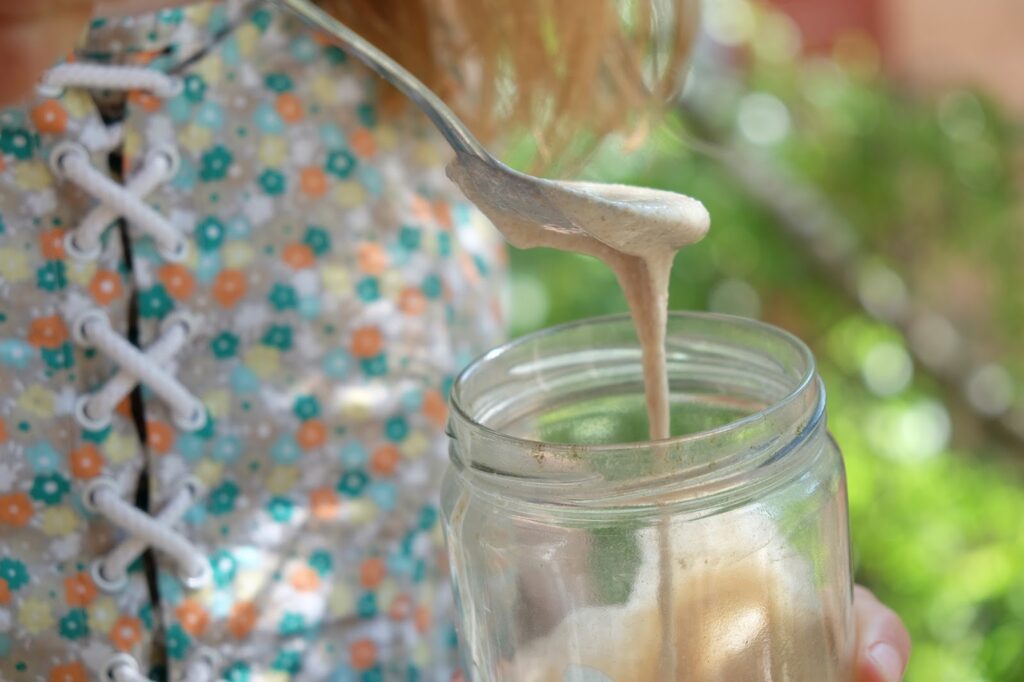
- Mix approximately the same quantities (a few tbsp) of water and spelt flour* (there should be a bit more flour than water, volume-wise). The mixture should be thick, but still pretty liquid, like the one in the picture.
- Leave it in a lightly covered jar at room temperature for 24 hours, and then add 3 tbsp flour and 2 tbsp water.
- Repeat the procedure after another 24 hours. Now you should already be able to sense that the smell of the mixture is changing from mild and nutty to a more sour, vinegar-like smell. You should also be able to see some bubbles forming inside the mixture. Those are signs that our dear microorganisms are feeding on the sugars from the grains and reproducing. That means that our starter is filled with living micro-beings that need to be fed regularly to keep the processes that we are interested in going.
- After another 24 hours you can feed it the same way again, or, if it already smells very sour, you can first pour half of it into another jar and then feed it. You won’t need the half that you poured out, but you can always make pancakes from it, or use it in some other recipe (so don’t just throw it away).
- Now the fermentation is probably already going on pretty fast and your starter needs to be fed twice a day, for example in the morning and in the evening. Just add some flour and water as usual.
- Once a day, before feeding, discard half of it into that pancake jar. You can skip that and just keep the whole thing, but in my experience, it ferments too fast and gets loaded with alcohol if you don’t pour some of it out once a day.
- After 5-7 days, the starter should look/feel perfectly bubbly and light and if you drop some in the water, it should float. Now you can use it to make sourdough.

Don’t use all of your starter for making the bread; make sure you always leave at least a few tablespoons of sourdough starter and continue feeding it, so that the fermentation goes on and you always have some starter ready for making new dough.
Now it should get nice and bubbly every day, so you can make the bread daily if you want. If you keep it at room temperature, it needs to be fed every day (preferably even twice a day, as described), but if you don’t bake as often, you can keep it in the fridge and take it out and feed it (and wait for a day until it develops enough bubbles) when you need to make bread.
You can also give some of the starter to your friends if they are as crazy and dedicated as you and have an interest in making some spelt sourdough bread…
* Note: I use only homemade whole-grain spelt flour that is naturally a bit coarse (milled with a stone mill, completely unprocessed) and the bread turns out great every time. If you want a more bubbly final texture of the bread, you can use some white spelt flour as well. I tried it and it works, but I prefer the taste of completely whole-grain bread.

How to make spelt sourdough bread
- Pour one cup of lukewarm water into a bowl. Add approximately (1/2-)2/3 cup starter, spoon by spoon so that you can check the quality of the starter. If it floats, it’s good, and if not, it means that it hasn’t fermented enough.
- Mix it with your fingers and continue mixing while adding spelt flour with your other hand. Add enough flour to form a soft but easily kneadable dough that preferably doesn’t stick too much.
- Knead it well and leave it in the bowl, covered with a wet kitchen cloth, for at least a couple of hours. I usually leave mine for 8-9 hours because I make it in the morning and then go out.
- Then take the dough out of the bowl (it should have already risen at least a bit by now), add enough salt and don’t knead it the classical way anymore. Just stretch it and fold it 5 or more times and let it sit for half an hour, then repeat the stretch and fold and place it into a baking mould.
- Let it sit some more covered with a wet cloth. It should sit for at least 12 hours altogether (from the moment of mixing flour and water). You can also leave it in the fridge overnight if you want to bake it tomorrow, the fermentation will continue going on very slowly at a lower temperature.
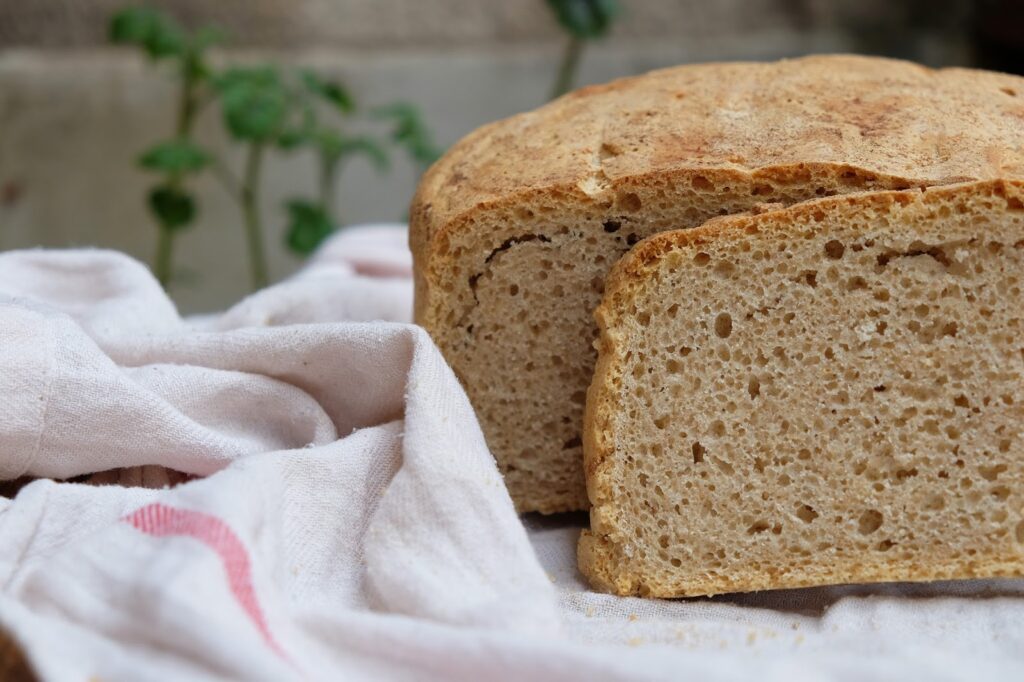
- When the dough is ready – when it has risen at room temperature and you can feel that it is bubbly inside from all the fermentation, you can put it into an oven preheated to 200 °C and bake it for around 30-40 minutes.
Note: If you have a program on your oven that adds moisture, it is good to use it, and if not, you can cover the bread with a big pot or a baking tray while baking, as that will help to keep it more soft and moist from the inside.
After 20-30 minutes in the oven, the bread can be uncovered and baked until it’s done. Your spelt sourdough bread is baked when it gets golden brown from the outside and the crust turns hard. If you knock, :), on the crust and you hear a sound as if it is empty inside, you can be almost sure that your bread turned out great.
Easy Spelt Sourdough Bread

Learn how to make spelt sourdough bread with this easy and intuitive recipe.
Ingredients
- 2/3 cup spelt sourdough starter*
- 1 cup lukewarm water
- spelt flour - enough to make a soft dough that can be kneaded (see the instructions)*
Instructions
- Make your sourdough starter by following the steps described in the article above.
- Pour one cup of lukewarm water into a bowl. Add approximately 2/3 cup starter, spoon by spoon so that you can check the quality of the starter. If it floats, it’s good, and if not, it means that it hasn’t fermented enough.
- Mix it with your fingers and continue mixing while adding spelt flour with your other hand. Add enough flour to form a soft but easily kneadable dough that preferably doesn’t stick too much.
- Knead it well and leave it in the bowl, covered with a wet kitchen cloth, for at least a couple of hours. I usually leave mine for 8-9 hours because I make it in the morning and then go out.
- Take the dough out of the bowl (it should have already risen at least a bit by now), add enough salt and don’t knead it the classical way anymore. Just stretch it and fold it 5 or more times and let it sit for half an hour, then repeat the stretch and fold and place it into a baking mould.
- Let it sit some more covered with a wet cloth. It should sit for at least 12 hours altogether (from the moment of mixing flour and water). You can also leave it in the fridge overnight if you want to bake it tomorrow, the fermentation will continue going on very slowly at a lower temperature.
- When the dough is ready – when it has risen at room temperature and you can feel that it is bubbly inside from all the fermentation, you can put it into an oven preheated to 200 °C and bake it for around 30-40 minutes. The bread is baked when its surface turns golden brown and hard, and the bread sounds hollow when you knock on it.
- Wrap the hot bread in a cotton cloth and let it cool down before slicing.
Notes
* Read the article above to learn how to make your own sourdough starter at home and how to maintain it once it is ready. You can also use a starter that somebody gave you; in that case you will only need to learn how to feed it to keep it alive for your next sourdough bread loafs.
* How soft should the dough be after you have added the spelt flour to the water and starter mix? The softest you can knead with your hands without making a mess - that's the consistency we are looking for. It will probably vary from person to person, but that is alright! The purpose of this recipe is exactly that: finding your own way to make sourdough and feeling the process rather than measuring.